
Clip-in hair extensions are one of the easiest ways to transform your look instantly. But if installed incorrectly, they can cause damage or look unnatural. Whether you’re adding length, volume, or color highlights, learning how to install clip-in hair extensions correctly is essential for a flawless, professional finish.
In this guide, we’ll show you a step-by-step tutorial, and recommend beginner-friendly SUZE WIG sets that are perfect for first-time users
Why Proper Installation Matters
Improper installation can lead to:
- Hair breakage or tension at the roots
- Clips slipping or extensions falling out
- Uneven, unnatural blending
- Discomfort or scalp irritation
By following the right steps, you can:
- Protect your natural hair
- Ensure a long-lasting, secure fit
- Achieve a seamless, natural look
What You’ll Need
Before starting, gather your tools:
- Clip-in extensions (SUZE WIG beginner-friendly sets recommended)
- Fine-tooth comb for parting hair
- Hair clips or sectioning clips
- Mirror (or dual mirrors) for the back of your head
- Heat tools (optional, for styling)
- Light hairspray or leave-in conditioner (optional, for blending)
Tip: SUZE WIG offers beginner-friendly sets with a U-shaped design and 170–200g weight, ideal for all hair types.
Step 1: Prep Your Hair
- Wash and dry your hair
- Clip-ins blend best with clean, dry hair. Avoid oily roots that can make clips slip.
- Detangle your hair
- Use a wide-tooth comb to gently remove knots, starting from the ends and moving up.
- Optional heat styling
- Straighten or curl your hair to match the texture of your extensions for seamless blending.
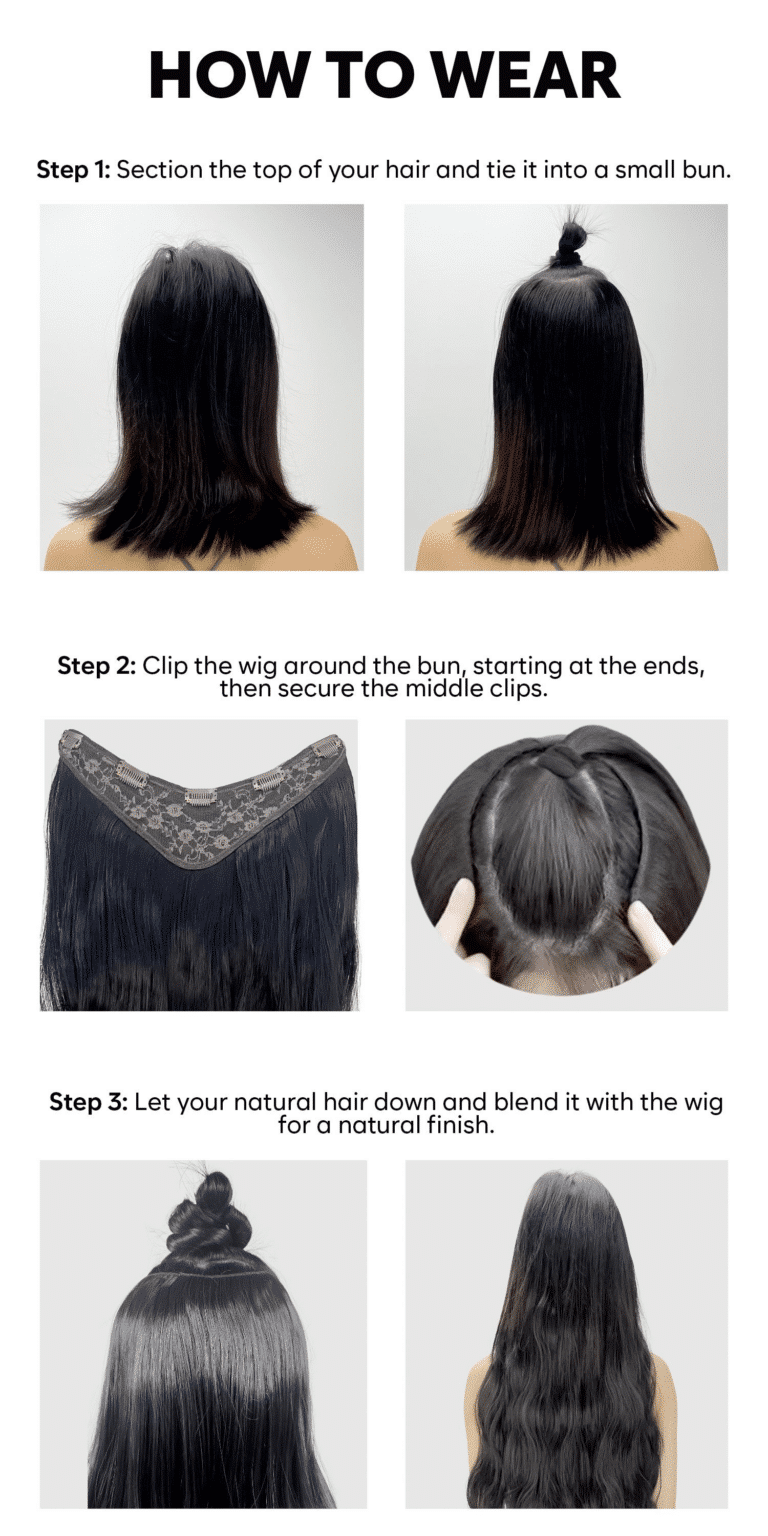
Step 2: Section Your Hair
- Create a horizontal part
- Use a fine-tooth comb to separate a small section at the nape of your neck. Clip the top layers out of the way.
- Start from the crown part
- Installing extensions crown part can give you seamless finish.
- Work in sections
- Divide your hair into horizontal layer from the top to avoid bulky spots and uneven distribution.
Step 3: Clip in the Extensions
- Open the clips on your extension wefts.
- Attach at the roots of your parted section, close to the scalp but not pulling the hair.
- Snap the clip shut gently to secure.
- Repeat across the section
- Most U-shaped extensions have multiple clips; attach evenly for balanced volume.
Key Tip: Avoid placing clips directly on fragile or thinning hair to prevent tension and breakage.
Step 4: Move Up the Layers
- Release the next hair layer above your first section.
- Check symmetry
- Make sure the clips don’t poke through your natural hair.
Step 5: Blend the Extensions
- Comb your natural hair over the clips
- Use heat tools (curling wand or straightener) to match the extension texture to your natural hair
- Style as desired
- Waves, curls, straight, or layered looks work well.
- Apply light hairspray to maintain style and smooth fly aways.
Pro Tip: Don’t over-brush extensions; use gentle strokes from ends to roots.
Step 6: Optional Styling Tricks for a Seamless Look
- Add layers
- Trim ends or layer extensions slightly for better blending with short hair.
- Face-framing pieces
- Pull out small strands at the front for a natural frame.
- Root teasing
- Add subtle volume at the crown if desired.
- Mix heat styling and leave-in sprays
- Prevent tangling and add shine for a polished finish.
Step 7: Removal and Care
- Open clips gently starting from the top section.
- Remove extensions slowly to avoid pulling hair.
- Detangle extensions before storing.
- Wash if needed
- Use sulfate-free shampoo and conditioner to maintain softness.
- Store flat or in a silk bag to preserve shape.
SUZE WIG’s high-quality human hair maintains durability even with repeated use.
Tips to Prevent Damage
- Avoid sleeping with clip-ins attached
- Don’t apply excessive tension on thin areas
- Limit chemical treatments on extensions
- Always match extension weight to your hair’s density
- Use heat protectants before styling
By following these tips, you ensure your hair remains healthy while enjoying the transformation clip-ins provide.
Why SUZE WIG is Beginner-Friendly
SUZE WIG makes installing clip-ins easy:
- Single U-shaped design hugs the head naturally
- Weight: 170–200g — full coverage, comfortable for all-day wear
- High-quality human hair — heat-friendly and durable
- Secure yet gentle clips prevent tension and breakage
Perfect for beginners, SUZE WIG ensures a professional-looking result without salon experience.
Shop at suzewig.com
Step-By-Step Quick Checklist
- Prep hair: Wash, dry, detangle
- Section hair: From nape and clip it on the top portion
- Clip in: Secure U-shaped extensions close to scalp
- Blend: Comb and style to match texture
- Optional styling: Add layers, curls, or waves
- Care: Remove gently, detangle, wash, store
Use this checklist every time for quick, professional results.
TikTok Demo & Visual Learning
TikTok has countless tutorials showing installation, blending, and styling techniques. Watching a visual guide helps beginners understand:
- Clip positioning
- Hair sectioning
- Styling tips for curls or waves
Conclusion
Knowing how to install clip-in hair extensions properly ensures a flawless look without damage. By following these step-by-step instructions and using SUZE WIG beginner-friendly sets, you can:
- Achieve instant length, volume, and style
- Protect your natural hair
- Blend extensions seamlessly for everyday or special occasions
Whether you have thin, medium, or thick hair, SUZE WIG’s 170–200g U-shaped clip-ins make professional-quality installation possible at home.
Start your hair transformation today with SUZE WIG